CCI Studio Examination and Treatment Record:
TREATMENT: *Asterisks refer to list of materials & supplies attached.; (1) The disintegrating upper edge of the original panel was consolidated with a weak solution of rabbitskin glue before removal from the frame. The oak fillet was detached from the upper edge. (2) A weak solution of size was introduced at the bottom edge of the panel to secure a loose area (c.f. CT/CCI 2,001,620-25/26). (3) Safety margin tests were made in order to establish the solvency of the varnish and, the resistance of the original paint. (4) Two layers of MS2A *(a) were applied as an insulation before the attachment of the facing papers. The first layer was brushed, the second sprayed to the face of the panel. (5) Facing Layers: *(i) Eltoline tissue *(b) applied with MS2A resin. (ii) Eltoline tissue applied with a weak solution of rabbitskin glue. (iii) Eltoline applied with wheat starch. *(iv) Slightly heavier grade Japanese tissue (Shoji #208 *) was applied with wheat starch. (v) Japanese tissue grade #208 Shoji applied with wheat starch. (vi) Japanese tissue grade #103 Takenaga *(d) applied with wheat starch. (vii) Muslin applied with weak solution of rabbitskin glue. (viii) Muslin applied with weak solution rabbitskin glue. The first and second facings were continued round the sides of the panel and attached to the reverse approx. 5 mm depth to ensure against undue stress to the edges of the painted surface during transfer. Each layer in turn was weighted and allowed to dry before the next layer was applied (c.f. CT/CCI 2,001,620-27-32 inclus.); A wooden trough was constructed 25 mm dimensionally larger than the panel and lined with mylar. Plaster of Paris was poured into the trough to a depth of 20 mm and agitated to form an even surface. The panel, which had been wrapped in mylar carefully stretched over the face side and taped rightly on the back to obviate any creases was then gently pressed face down into the liquid plaster. (c.f. CT/CCI 2,001,620-33-38 incls.); When the cast was completely hard the sides were removed from the trough and it was placed onto a backing board. Four mitred pieces of wood forming a frame to lock the cast firmly in position were then screwed to the backing board. These were the same thickness as the cast. The objective was to form a rigid support for the panel while the back was cut away. The backing board was clamped securely to the bench (c.f. CT 2,001,620-39).; A hardwood bridge was devised which spanned the panel and a stop on the backsaw allowed cutting only to a depth of 1 mm, thus ensuring that the operation of removing the support was under absolute control all the time. (*c.f. CT 2,001,620-40-44 incls. and Figs. 3, 4 & 5).; On either side of the framing pieces 3 fillets of wood 1.5 mm in thickness, 25 mm in width, the length of the panel, were pinned to the backing board. These fillets provided a means by which the saw could be lowered after each complete series of transverse saw cuts.; The first series of controlled saw cuts were made with all three fillets in position. The cuts were made approx. 10 mm apart. The wood was then removed by chiselling with the grain to the depth of each saw cut in turn. As each layer of wood was cut away from the panel one of the fillets was removed from either side and the bridge in consequence was lowered by the amount equal to the thickness of the fillet. This process was repeated until the support was reduced to a thickness of 1 mm.; The whole process from the fabrication of the cast to the point at which the panel was ready for its new support is illustrated with those slides already enumerated and forward to CT CCI 2,001,620-111 incls. Of these, CT CCI: 2,001,620-48-55 inclus. show the isolation and undercutting of the seal which was to be preserved and later to be inset in the appropriate place on the new support. The seal is shown removed in CT CCI: 2,001,620-56. During the process of the removal of the panel many dead wood boring insects and fragments of insects were found - the positions of which were recorded as fully as possible both in area and depth. A graph and list of these positions is attached under Sheet 1 (insects). Slide No. CT CCI:2,001,620-84 shows an overlay charting the exact positions (area) of the various insects found. (attach sheet 1 (Insects)); There are a number of colour transparencies taken during the removal of the original support - these are enumerated and explained - in the Photographic record of colour slides accompanying the report Nos. CT CCI: 2,001,620-57-111 incls.
Application of New Support
After very careful deliberation it was decided not to use a strictly rigid support for the painting and it was felt that something slightly more elastic and easy to remove should be considered. Accordingly 1/32" balsa wood, 2.5" wide impregnated with wax resin mixture was chosen as being the most acceptable material. The method of impregnation is shown in 35 mm colour transparency CT CCI: 2,001,620-112.; The series of transparencies CT CCI: 2,001,620-113-131 incls. show the manner in which the new support was built up. The first layer of balsa applied was vertical, the second horizontal, the third left to right diagonal, the fourth right to left diagonal. CT CCI: 2,001,620-122, shows the thin sheet of masonite with which the balsa wood impregnated strips were finally covered. To the back of this masonite sheet a final layer of balsa into which the seal had been sunk, in the same position it had occupied in the original support, was attached with P.V.A. Jade *(e) (c.f. CT CCI: 2,001,620-125-131 incls.).
Cleaning
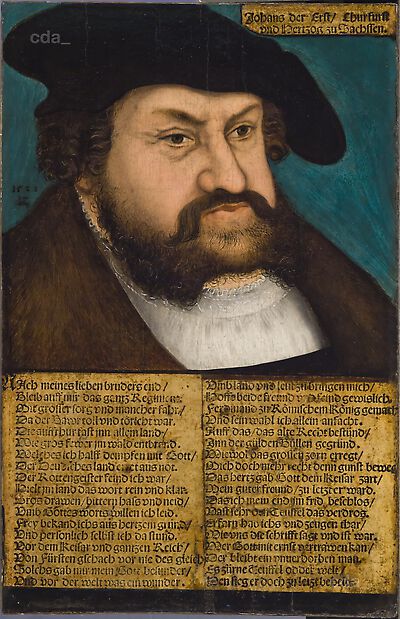
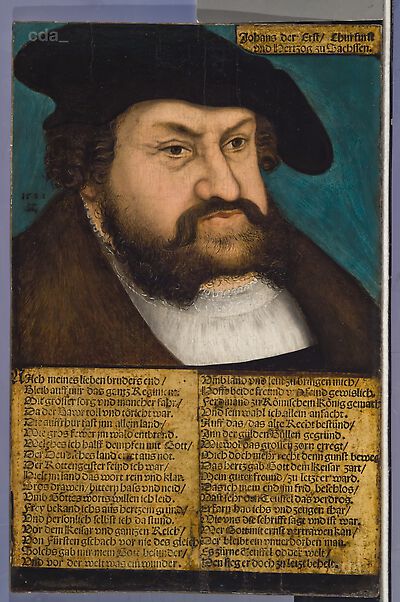
Because of the generally poor condition of the painted surface it was decided not to completely remove the varnish layer and all overpainting. To do this would have undoubtedly revealed a 'ghost' of a painting only. There was sufficient evidence from a purely visual examination that the painting had been overcleaned in the past and heavily retouched on several different occasions. One small point of interest were the 2 or 3 beetle flight holes piercing the paint layer which at some stage had been filled with an extremely hard putty and retouched. (c.f. analysis report attached May 27, 1977 Neil Adair and slide Nos. CT CCI: 2,001,620-106-107).; The extent to which the varnish and overpaints were removed is illustrated by the photograph taken in UV light Neg. No. B/W2,001,620-154. The discolouration was most disturbing in the facial area. Elsewhere, although extensively overpainted especially in the areas of the fur coat and the hat, the additions were not as disturbing and were left as found other than the lightest surface cleaning.; The heavy repaint on the left cheek (examiner's viewpoint) was partially removed (c.f. CT CCI: 2,001,620 ) as were the overpaints following cracquelaure in the facial area and those in the area of the shirt. These were softened with a mixture of isopropyl alcohol, acetone and stoddards solvent and carefully removed with a scalpel under low power magnification.; Perhaps the best way in which to explain the manner and extent of the work carried out would by comparison on before, and after detailed photographs and in this respect reference is made to the attached list of transparencies Nos. CT CCI: 2,001,620-134 to 211 inclusive.; Small deficiencies in the painted surface were filled with chalk and moviol *(f) putty tinted with watercolour and isolated with Synocryl 9122 x *(g). The varnish layer applied before retouching the panel was MS2A diluted in Stoddards solvent.
Retouching
There was no major reconstruction of the painted surface and no opaque overpainting of the original surface. Retouching was confined only to the obvious damages where the surface had been abraded and tonal variences disturbed. There was light glazing where necessary. Retouchings were executed in watercolour and glazings in MS2A resin mixed with dry pigments. A final varnish of MS2A plus 4% bleached beeswax was applied.; After a month the panel was polished with a microcrystalline wax paste *(h) (soluble in Shellsol 715).
Sheet 1 (Insects)
Bugs with print of radiograph - man facing to the right; (1) 178 from top 67 from right; (2) (wasp) 100 from top 105 from right; (3) 10 from top 105 from right; (4) 40 from bottom 27 from left; (5) 215 from bottom 31 from right; (6) 121 from bottom 31 from right; (7) 340 from bottom 157 from right; (8) 90 from bottom 45 from left; (9) 55 from bottom 38 from left; (10) 140 from bottom 113 from right; (11) 247 from bottom 113 from right; (11) 247 from bottom 107 from right; (12) 277 from bottom 26 from left; (13) 323 from bottom 14 from left; (14) 98 from bottom 38/39 from right; (15) 218 from bottom 23 from right; (16) 193 from bottom 20 from right; (17) 170 from bottom 52 from right; (18) 137 from bottom 59 from right; (19) 137 from bottom 70 from right; (20) 138 from bottom 60 from right; (21) 133 from bottom 85 from right; (22) embedded in new gesso 184 from bottom 3 mm from right; (23) 33 from bottom 125 from right.
Materials and Supplies Used
(a) MS2A Polycyclohexanone (OL) resin, (no longer manufactured) - soluble in white spirit (shell household cleaner) or Stoddards solvent.; (b) Eltoline tissue. J.R. Compton Bros. England; (c) Japanese tissue paper Shoki #208. Aiko; (d) Japanese tissue paper Takenaga #103. Aiko; (e) Jade 403. Polyvinyl acetate water dispersed resin. (f) Moviol 04-M1 Polyvinyl Alcohol. Hoescht Ltd.; (g) Synocryl 9122 x (Bedacryl 122x) Methacrylate ICI; (h) Renaissance microcrystalline wax polish (soluble in Shellsol 715). Picreator Enterprises, England.